Wednesday, November 14, 2012

Grandpa's Heart

I wanted to share another project that I recently completed using items I received from my grandma's house that we were able to pick from. In the third stall garage of their house grandpa had his 'shop'. We were able to take home a few tools that we have put to great use already...mostly Mike doing the 'man' work for me. :) I decided to take a few old hearts that grandpa had cut out years ago. I have great memories of getting the hearts from grandma and grandpa for us to paint, color, or whatever we wanted to do to them. We spent many afternoons decorating hearts for ourselves, mom, grandma and just for the heck of it! It helped that mom had an entire cupboard full of paint and paintbrushes for us to use!

Deciding how to use the hearts was simple - I wanted to paint them, like years earlier, but obviously with a more steady hand! On Etsy, I had seen a Valentine's Day decor piece for sale and thought that I could easily make a similar piece with grandpa's hearts. 

Here is the process!

Items/tools needed:
  • 3 wooden hearts
  • 3 small wooden dowels (mine came from Wal-mart in the kid's craft section)
  • 2" x 12" x 1/2" piece of wood, roughly (mine came from grandpa's scrap pile)
  • craft paint (I used red and off-white)
  • sand paper
  • hot glue gun
  • drill


The process was very easy. It can be done in any order but this is just what worked for me. I started off by painting all sides of the hearts. I did one heart using the red paint. The other two hearts I mixed the red with the off-white to create different hues of red/pink.


In the meantime, I had Mike cut the bottom stands out of the piece of wood and I used garden shears or branch cutters (don't know the technical term) to cut the dowels to staggered heights. The smallest heart had the least wide base, whereas the largest hard had the widest base. I just eyeballed what looked best. 

Now that the hearts were dry, I used the sand paper to roughen the edges of the hearts for a rustic feel. Then once again, my dear husband helped out by drilling holes in the bottom of the hearts and in the bottom stands for the dowels.

Once we had all the pieces cut, I put everything together using my best friend...my hot glue gun! I put a little glue in each hole and inserted one end of the dowel into the bottom of the heart and the other end in the matching base. Let the glue dry and then time for more paint!

After everything was dry and assembled to my liking I painted the dowel and the base black. Once dry, I used the sand paper to roughen the edges of the base like I did with the hearts...and VOILA!


There you have a new piece of decor for Valentine's Day! You can add glitter to the hearts or anything else you wish but I felt less was more in this case. The hearts will continue to remind me of my grandpa and the days spent with my sister's 'crafting!'


Thursday, October 11, 2012

Garage Sale Find

This summer I found a piece at a garage sale that I was really excited about. It set me back $5....yikes! Haha! The structure would fit my existing furniture but it could definitely use some work. It needed a lot of sanding and a new paint job. Hunter green was NOT my color!


I forgot to take a 'before' photo prior to sanding the top of the table. It was hunter green as well with a lot of scratches. Mike helped me out on this project by doing the sanding. He was pretty excited about using his new belt sander. Ideally, it'd be great to use an orbital sander but we made do with what we had!

He sanded the entire table down, legs, bottom shelf, top, edges, etc. Sand that baby down!


We had to sand the set-in parts by hand since the sander was too large to fit in those tighter areas. After sanding, I wiped it down with a wet rag to get all the saw dust removed so it's ready to paint.

I decided to go with the spray paint application as I didn't want to see brush marks. Since it's down to the actual wood, it's best to spray on a primer before the color. I used Rust-o-leum Painters Touch Gray Primer. After a lot of research, many painters recommended this brand. 


As always, it's best to do multiple light coats rather than a couple thick coats. I spent the afternoon spraying a coat on and letting dry for 20 minutes, spraying another coat, drying 20 minutes, and so on. 

Here is the result after 4 or more primer coats.


Once the primer is completely dry, you can lightly sand the piece again to smooth out the paint or start in on the final painting of the piece. I decided to skip this step but if I were to do it again I would give it a light sanding so it was even more smooth, but it's completely up to you and if you've got the time. I was so excited to get it done and use it so of course I headed right to the black spray paint! Again, I did multiple light coats of the black spray paint until everything was evenly covered. Let that dry at least overnight and then it's ready to be used!

Here is the final product! I decided to put the table by our door from the garage that comes into the kitchen and living room. It was a nice little corner that screamed for a side table. 


I'm still trying to find decor to fit the table. I put my red scented wax warmer on the table and ran the cord down the back right leg and tried to 'hide' the cord as best possible. I used a gloss black paint for the table so the bright light from our south sliding doors creates a shine in the bottom picture that makes it look 'gray' in some spots. That is due to the light and how the camera catches it. 

For $5, a little sanding, and some spray paint I gave myself a new side table that would easily cost $50 in store. 

Mike hears this all the time as I say this too often but it's true - Imagine what a little paint can do to that! Never count anything out!

Thanks for reading!

Tuesday, October 9, 2012

Halloween Time!

Halloween is getting close...too close! I can't believe how fast the summer went and now autumn is cruising by.

I thought I would share one of my Halloween crafts that I completed last year but never got around to sharing - Coffee Can Jack-o-Lanterns! Because Mike drinks coffee like water, it seems like we always have coffee cans in stock. 

Items needed:

  •  metal coffee can
  •  hammer
  •  nail (Mike, and supposedly the rest of the world, calls it a spike)
  •  freezer
  •  orange spray paint
  •  black craft paint
  •  small paint brush
  •  thin wire

First start by filling the metal coffee can with water and place it in the freezer until the water is frozen solid. This will allow you to make the holes in the can without the can completely flattening or getting major dents.


Remove the can from the freezer and place a towel underneath it on the floor (to protect the floor and limit movement). Now you'll need the hammer and nail spike. I used the nail to 'draw' my design on the can like a pencil. This worked because of the frost on the outside of the can. Then start hammering the nail along the lines you 'drew' - creating the outlines of your jack-o-lantern face. A couple quick hard hits will be sufficient for each hole. You will need to work somewhat quickly so the ice doesn't melt too much. After punching the holes for the face, punch a hole at the top of the rim on the left side of the can and the right side of the can for the wire on the last step.


Once you have the entire face created, let the rest of the ice melt so you have only the dry can left.

Now it's ready to be painted. I used regular gloss orange spray paint from Wal-mart. Give it a few light coats, rather than 1 thick coat.


The two pictures above were taken with different camera settings so ignore the crazy coloring between the two!

Once the can is dry you're ready to paint the faces black. I used a gloss black craft paint and small paintbrush. Stay between the lines if you can!

Last step is adding the wire handle. Place the wire through the holes on the right and left side of the can at the top and curl the ends around a pencil for a cute little curl. I used about 18-20 inches of wire for a can. This allows for the curl on the ends. 

Now you can place a small lit candle or tea light in the bottom of the can and enjoy the glowing faces!

I ended up making two of them so I had a 'set'. Here is the final product!


Next time you're thinking of throwing away those coffee cans - consider making yourself a piece of Halloween decor! 

I wish everyone a fun and safe Halloween!

Monday, October 1, 2012

Refurbishing an Old Piece

I like to visit the bargain shop here in Carroll once in awhile to find any items that I could refurbish. I was really excited about the hanging chalkboard item that I found a while back for $2. Definitely nothing too pretty as is, but I saw potential! 

Here is the board with a stamped birdhouse and hearts design on fabric. The chalkboard part wasn't the best quality - the chalk didn't write well on it.


I painted the frame with gloss black paint and a brush. Then I took out the chalkboard back and covered it in a fun fabric. Instead of a chalkboard it is now a decorated bulletin board. For the top, I took out the stamped fabric and put in a printed "Meyering" and a piece of glass.

Here is the final product!


We have this hanging in our newly painted and decorated laundry room. I recently designed a small cheat sheet of laundry stains and their solutions and tacked it on this bulletin board. 

Always think beyond what you see - it's amazing what a little paint and fabric can do! A very inexpensive piece of decor!

Friday, September 28, 2012

My Brand New Old Mirror

In the past year, my Grandma has moved into an assisted living apartment and my aunts and mom spent time going through the house with her cleaning things out and sorting through everything. This summer we were able to get all of the family (all 11 grandkids) back home for one weekend to go through the house and pick out which items we would like to have. So many different items and so many memories behind them all. It was such a bittersweet time - having to say goodbye to the house and seeing everything that brought back so many memories. But being able to take some of those memories and bring them into our own home and cherish them for years to come....words can't describe. 

I can't even begin to list all of the unique, vintage, and practical items that Mike and I received. There are so many that we are thankful to have, but I would like to share one of my favorite items. 

Grandma always had a large mirror at the bottom of her stairs...the stairs we ran up and down so many years as kids, playing house, school, babies, or just playing games and trying to scare our parents. Of course, I didn't think much of it as a child, but as time went on and I got older, it hit me one day that we won't have this house forever and things will change. Change is not an easy thing for me to handle. When we finally accepted that Grandma wouldn't be returning to her house I knew I wanted something to remind me of the house and all the memories. I had my eyes on that mirror....not because it hung at the bottom of her stairs, not because it was beautiful, but because it was a reminder of all the time spent at her house whether for the holidays, sleepovers, flapjacks, playing with the cousins, etc. It's my little piece of her house that will always give me that reminder of her and the memories she helped to create in that house.

The mirror was actually part of a set - it had a shelf and two sconces. Below is a photo of the full set. I had the perfect idea of how I wanted to use it in my house rather than storing it away to hardly ever see it.


The project was actually quite simple. I started by painting the set black. Because of the intricate design it was more easily covered by spray painting. I got the backyard all set up to spray paint using my handy spray paint gun handle (makes it a lot easier on the finger) and went to town covering the old brass paint. Mike thought he needed to catch me in action and it would be good to have a photo with me in it...ehhh, not sure I agree! Ignore the 15 year old t-shirt!


You'll notice in the above picture where the sconces would hold a tall, tapered candle. Instead, I wanted to use wider candles so we sawed off those ends, leaving just a 2 inch circle remaining (see photo below).

Here it is all painted! I painted the shelf too but didn't have it in the photo. 


Instead of putting the mirror glass back in the frame, I decided I wanted to use it in a different way. I finally pulled out the Cricut machine and learned how to use it! Love it! I have so many ideas now! Using black vinyl and one of the cartridges that has fonts on it, I picked the letter 'M' to be cut out. The Cricut cut out a perfect 'M' for me in the vinyl! I was surprised at how slick it was!


After getting the vinyl all cut, I spent time getting the candles ready and attached to the sconces. Unfortunately, I don't have any photos showing how I did this, but let's just say toothpicks and a glue gun work wonders! I also decided to add a little detail to the candles by affixing a black grosgrain ribbon around it. 

I finally had the candles and vinyl ready, the whole set painted and headed to the bedroom to put it all up!

Here is the final product!


Next on my list is updating our bedding to something a little more fancy to fit the set better. 

I'm excited it turned out just as I imagined, maybe even better. I'm so grateful to be able to enjoy this in my own home for years to come and have the reminder everyday of someone who means the world to me and has given me so many wonderful memories! 

Monday, August 20, 2012

Finishing of the Closet!

Sooooo....I've been extremely behind on my blogging, as you can tell. This summer has been crazy busy for us. I'm excited to update everyone on the closet. Yes, it is finally finished....about a month and a half ago!

At the end of June, Doug came by and put the new stained closet door on. Mike's parents came down and helped us get the hardware and shelving installed. The design of all the hardware, shelving, etc was thought up ourselves. We knew we wanted A LOT of hanging space but also a decent amount of shelving. I thought it would be nice to have some small shelving as well. 

Here are a few photos of the installation process:

Starting the shelves on the back wall

I'm slightly excited to see the start of shelves! I think Ruth agrees with me too!

The shelving on the back wall all completed!

Hanging the brackets for the hanging rods and shelving.

Shelving installed!!

At this point we were still waiting for Doug to come in and finish the baseboards and trimwork around the door. It's coming together!

A week or two later, Doug came by and added the baseboards and the trimwork around the door! We were thrilled to have a finished closet to put to use!

Here are a few shots before we started loading it up!

New trimwork around door and fresh coat of paint all around edges.

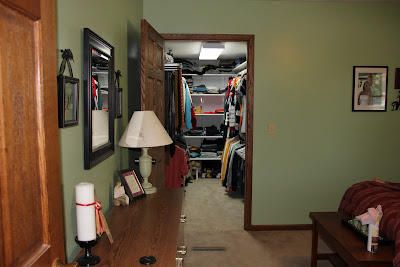
Finished closet - with added baseboard and trimwork!

Closer look inside at hardware

Small, short shelving on the left

A view from inside looking out

Finally it's time to start filling that baby up! How exciting! The process actually took longer than I imagine because we both wanted to have some sort of order to our clothes and where we put it. We weren't sure how much space we would each use up and what should go where. We just started hauling things in from the spare bedroom closet and organized as we went. 

Just the start of it...

Bella checking out the new place!

It's full!

Mike has the left side and I have the right side - the back is split.

Another view inside

Space for my cart with drawers (can be removed for additional hanging space)

Extra smaller shelving for smaller items and accessories.
And Mike's favorite, his rotating tie rack!

And now, an empty spare bedroom closet!

We are so excited to have all of our clothes back in our bedroom. It makes it a lot easier! Everything feels so organized and has it's own spot. It's great! Plus, we have an empty spare bedroom closet that can be put to great use down the road. I'm sure I'll find things to fill it up sooner than later though. Eek! 

I still find myself going into the spare bedroom to get my clothes or shoes - it's just habit! I'm slowly getting better at it! Mike also forgets too since he's ALWAYS had his clothes in the spare bedroom closet, even before that one got re-done. With the new closet it seems like the bedroom is keeping cleaner, longer. Bonus!

While I was in Pella for the Central Color Guard camp, Mike spent his nights painting the outside of the house where the closet was added on. He did a great job and finished it in no time. Thankfully the previous house owners left a 5 gallon bucket of the exterior paint so that was easy. Of course the house color has changed over the past years with sun damage, dirt/wind, etc so the new paint looks slightly brighter if looking very closely. Other than that, it's a job well done!

Deck (south) side all painted!

West side all painted, including the new downspout!
 
That's the end of this process! I remember just last spring (2011) we were talking about how we could use that extra deck space and then thinking up this idea. Now, here we are and it's done, finished, completed, final...and we have a new walk-in closet off the main bedroom and a new larger closet in the spare bedroom! We're very happy with the outcome and hope to get a lot of good use out of it. Hope you enjoyed seeing the process!

Sunday, June 17, 2012

Before and 'Somewhat' After Photos

I thought I would share some before and after photos of the deck/closet area. I still can't believe how different things feel and I'm extremely attached to this new closet and don't think I'll ever be able to leave....ever! Haha!

Exterior Deck View


Interior View


Exterior Ground View


On Friday, Doug stopped by in the late afternoon and started hanging the closet door. They got the door hung, but need to build a floating jamb, nail the trim work and attach the baseboards. These last steps are sl..ow..ly coming together.

Yesterday Mike's parents came down for the day to help us out with assembling the interior of the closet. We spent most of the day working on that and we thank Sherman for his hard work, skills, and knowledge, and Ruth for her help and keeping us sane with goodies and supper. The shelving, rods, and brackets are all installed and it actually looks like a closet! I'm SOOOOO excited! I will actually have a place to put my clothes, rather than piles on the floor or in the basement.

Once the door, trim work, and baseboards are in I will post the finished product! We have photos we took yesterday of our work and will share those as well with the finished product!

We still have the exterior painting to complete on the new masonite siding so if anyone has the itch to paint and come to Carroll - feel free! :)

Thanks for reading!